
This post contains affiliate links. If you buy through our links, we may earn a commission at no extra cost to you.
Mouse-proofing isn’t one thing you do once — it’s a system. Here’s the complete checklist: seal every entry point by size, remove what attracts them, and set up monitoring so you catch the next one before it becomes ten.
Most homeowners think about mouse control after they have mice. By then, you’re already in reactive mode — trapping, cleaning up droppings, figuring out where they got in.
Mouse-proofing flips that equation. It’s the set of structural and behavioral changes that make your home genuinely unattractive and inaccessible to mice — before they arrive, or right after you’ve eliminated an infestation and want to make sure it doesn’t come back.
The timing that matters most: fall. Mice move indoors in September and October as temperatures drop, seeking warmth and a winter food supply. A mouse-proofed home in August is a home that doesn’t deal with a winter infestation.
This guide covers the complete mouse-proofing system: seal entry points (by location and gap size), remove attractants inside and outside, and set up a monitoring layer that catches any breakthrough before it becomes an infestation.
Mouse-Proofing Checklist at a Glance
EXTERIOR SEALING
- Foundation cracks sealed (steel wool + caulk or hydraulic cement)
- All utility penetrations sealed (pipes, wires, HVAC, cable)
- Door sweeps installed on all exterior doors
- Garage door bottom seal inspected and replaced if worn
- Weep holes covered with weep hole screens
- Roof vents, soffit vents, and gable vents fitted with ¼-inch hardware cloth
- Firewood stored 18+ inches off ground, away from house
- Vegetation trimmed 18+ inches from foundation
INTERIOR SEALING
- Under-sink pipe gaps sealed
- Behind appliance gaps sealed (refrigerator, stove, dishwasher)
- Basement/crawlspace penetrations sealed
- Attic access points inspected
ATTRACTANT REMOVAL
- All pantry food in sealed hard containers (not cardboard or thin plastic)
- Pet food not left out overnight
- Compost bin sealed or kept far from house
- Trash cans with tight-fitting lids
- Clutter in garage, basement, attic minimized
MONITORING
- Glue boards placed in 3–4 key locations (under sinks, basement, garage)
- Monthly inspection routine established
Part 1: Seal the Exterior — Where Mice Actually Get In
A house mouse needs a gap of approximately ¼ inch (6mm) to squeeze through — roughly the diameter of a pencil eraser. A young mouse can fit through a hole the size of a dime. This means gaps you’d consider trivial are genuine entry points.
Exterior sealing is the highest-leverage part of mouse-proofing. Get the outside right and the interior work becomes much simpler.
Foundation and sill plate
The gap between the foundation and the wood framing of the house (called the sill plate area) is one of the most common mouse entry zones. Walk the entire perimeter of your home at ground level and look for:
- Cracks in the concrete or masonry foundation — any crack you can fit a pencil into needs sealing
- Gaps where the wood framing sits on the foundation — often visible as a thin horizontal gap running along the base of the house
- Gaps around the base of attached decks or porches where they meet the foundation
Sealing method:
Small cracks (under ½ inch): DAP latex caulk applied with a caulking gun. For cracks in concrete, hydraulic cement sets hard and is more durable than caulk alone.
Gaps at the sill plate (½ inch to 2 inches): Stuff with copper mesh first — unlike steel wool, copper mesh doesn’t rust and compress over time — then seal over it with expanding foam. Let cure 24 hours and trim flush.
Products:
Xcluder Fill Fabric (rodent-proof copper mesh)
DAP Alex Plus Paintable Latex Caulk
Utility penetrations
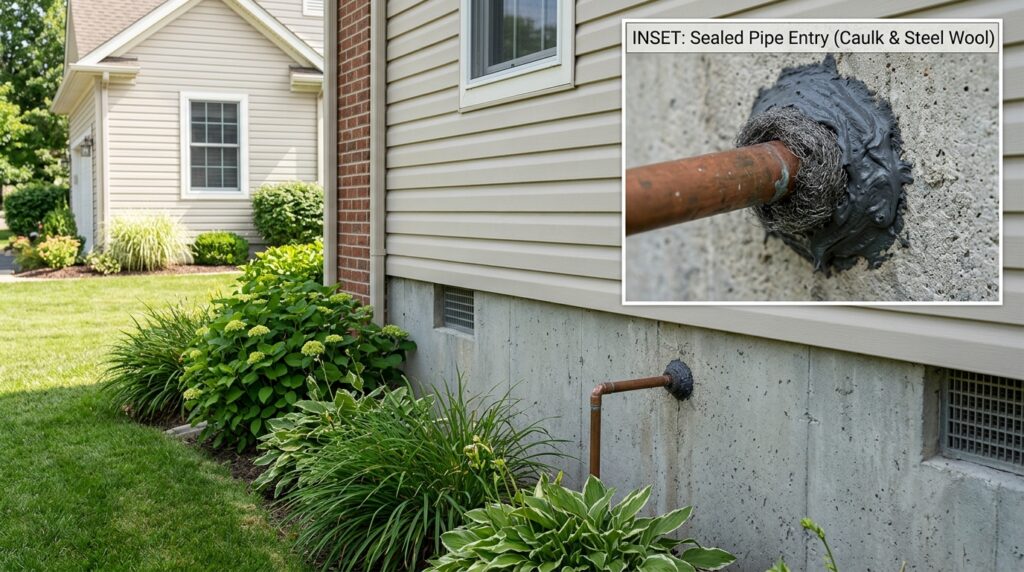
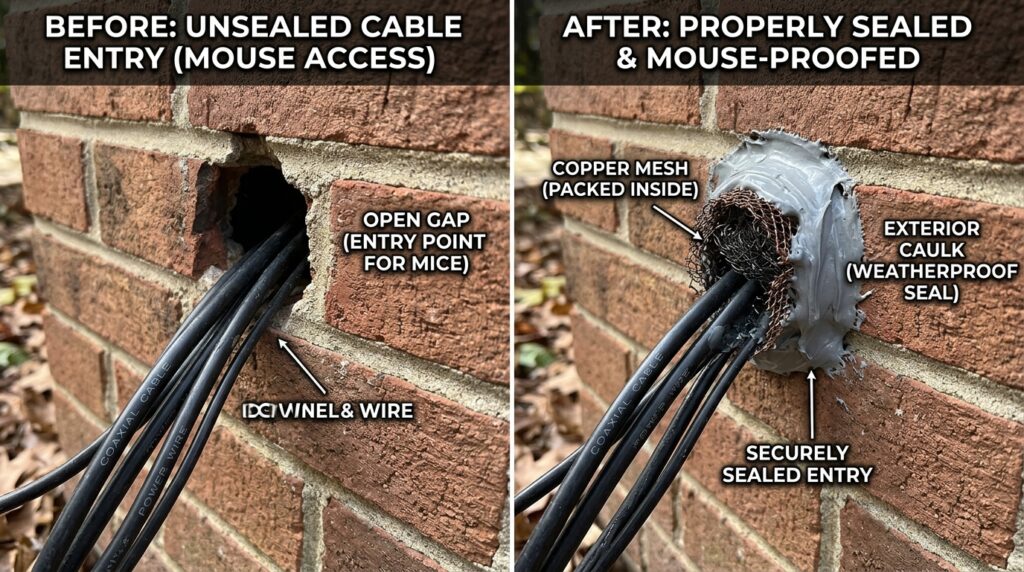
Every pipe, wire, conduit, and HVAC duct that passes through the exterior wall is a potential entry point. Inspect all of these — gas lines, electric conduit, water supply, cable/internet lines, dryer vents, A/C refrigerant lines — at the point where they pass through the foundation or exterior wall.
Even a well-installed utility penetration develops gaps over time as the caulk around it cracks and shrinks. Look for gaps between the pipe and the wall surface; even a thin gap of ¼ inch is enough.
Sealing method:
Pack copper mesh around the pipe in the gap, then seal with exterior-grade caulk (not interior latex — exterior caulk is more flexible and weather-resistant). For gaps over 1 inch, use expanding foam after the mesh, then caulk over the foam for a clean finish.
Doors and garage
The gap under an exterior door is one of the easiest mouse entry points in the house. A gap of ½ inch under a door — visible as a sliver of daylight when the door is closed — is an open invitation.
Door sweeps:
Install a door sweep (a rubber or brush seal attached to the bottom of the door) on all exterior doors including the door from the house to the garage. The sweep should contact the threshold with no daylight visible.
Door Draft Stopper / Sweep (adjustable): MAXTID Large Door Draft Stopper 36 Inch, Adjustable Double Sweep, Black
Garage doors:
The rubber seal along the bottom of the garage door compresses and wears over time, leaving gaps. Press the closed garage door from the inside and look for light at the corners and edges. Replace worn seals — they’re inexpensive and fit standard 2-car garage doors.
Garage door bottom seal with T-end: T Ends Garage Door Seals Replacement 16′ Wide Garage Doors
Vents and openings
Foundation vents, crawlspace vents, soffit vents, gable vents, and ridge vents all serve ventilation functions — but many have screens that have deteriorated, or openings large enough for mice. Check all of these:
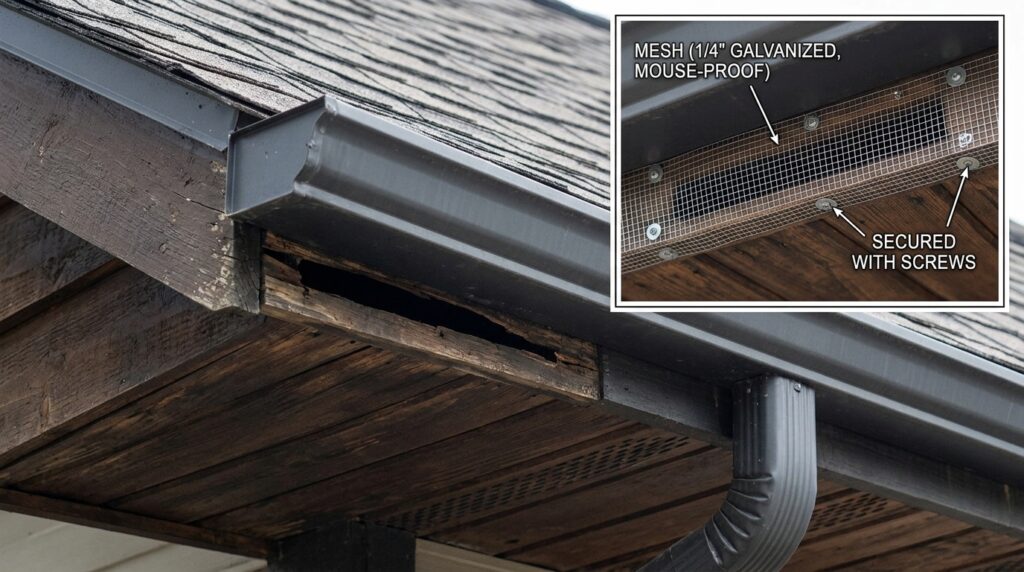
- Foundation/crawlspace vents: Replace any broken screens with ¼-inch galvanized hardware cloth. The ¼-inch mesh size is critical — standard window screen (which has larger openings) doesn’t stop mice.
- Soffit vents: Check from the attic for any gaps where soffit panels meet the fascia board, or where vents have pulled loose from their housings.
- Gable vents: The most common attic entry point for mice and squirrels. If the screen backing of the gable vent is damaged, cover it from inside the attic with ¼-inch hardware cloth screwed to the framing.
- Weep holes: In brick veneer construction, the intentional weep holes at the base of the brick allow moisture to drain out but also let mice walk in freely. Install plastic weep hole covers — they allow water drainage and airflow while blocking entry.
Part 2: Don’t Forget the Roof Line
Mice are excellent climbers. They can scale rough brick, climb along wire conduits, and shimmy up downspouts. The roof line is an underappreciated entry zone that most homeowners never inspect.
Where mice enter at the roof level
- Where roof fascia boards have pulled away from the soffit — a gap of even ½ inch along the roofline
- Where roof sheathing meets the top of the exterior wall (the “rake” area on gable ends)
- Around chimneys — gaps at the flashing where the chimney meets the roof, and open dampers in unused fireplaces
- Where tree branches overhang or touch the roof — mice travel along branches and drop onto the roof
What to do
- Trim tree branches to maintain at least a 4-foot clearance from the roofline — this also reduces squirrel access
- Inspect fascia and soffit from the ground with binoculars, or from a ladder; seal gaps with exterior caulk
- Check chimney flashing; a chimney cap with mesh sides allows ventilation and blocks rodent entry
Part 3: Interior Sealing — The Secondary Defense Layer
Even if a mouse gets past the exterior, interior sealing limits how far it can travel through the house and gives you fewer points to trap. The key interior locations:
Under sinks (kitchen and bathrooms)
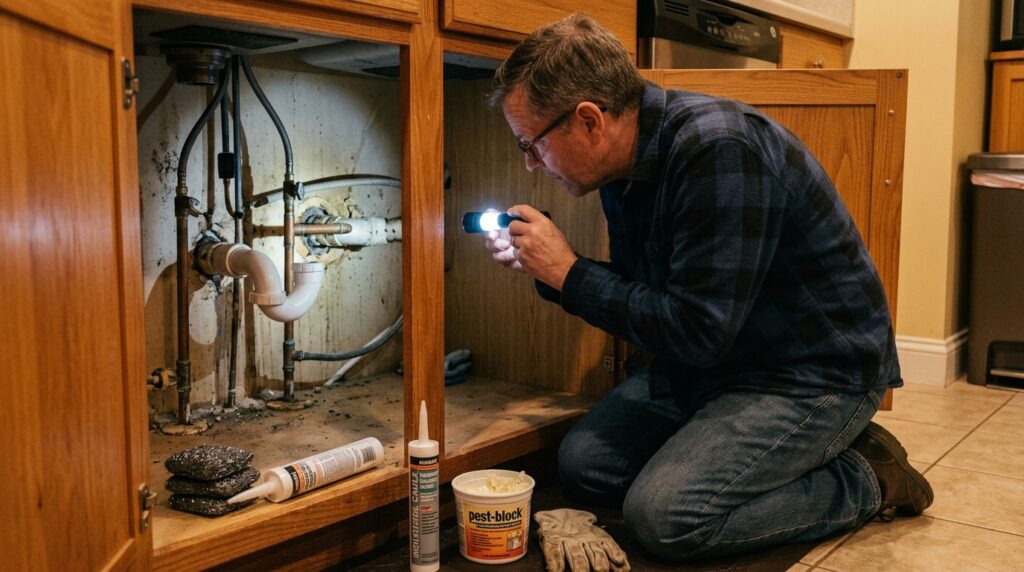
The gap around the drain pipe and water supply lines where they enter through the cabinet floor is one of the most-used indoor mouse highways. This gap connects directly to the wall cavity or the crawlspace below.
Open the cabinet under every sink in the house and look at the pipe penetrations. There’s almost always a gap. Stuff copper mesh around the pipe, leaving the pipe free to move, and seal with caulk or expanding foam.
Behind appliances
The back of the refrigerator space, the space behind the stove, and the cabinet around the dishwasher all have gaps at the floor where utility lines enter. Pull appliances out once a year (ideally fall) and seal any gaps you find.
Basement and crawlspace
If you have an unfinished basement, inspect the entire perimeter where the basement wall meets the floor — particularly around any pipe chases (vertical cavities that carry pipes between floors). Seal open pipe chases at both the top and bottom with copper mesh and foam.
In a crawlspace, check where pipes and wires enter through the floor joists. Any open gap is a potential entry point from the crawlspace into the living area above.
Part 4: Remove What Attracts Mice
Sealing entry points makes your home structurally inaccessible. Removing attractants makes it less worth trying to enter in the first place. Mice are driven by three things: food, warmth, and nesting material. Remove as many of these as possible.
Food storage
The most common mouse attractant in American homes is improperly stored pantry food. Mice can chew through cardboard boxes and thin plastic bags in seconds.
Switch to hard-sided containers for:
- Grains: rice, oats, cereal, flour, cornmeal, pasta
- Pet food — especially dry kibble left in its original bag
- Bird seed (stored in garages or utility rooms)
- Snack foods in thin plastic bags
OXO Good Grips Pop Containers (airtight, stackable): OXO Good Grips 10-Piece POP Food Storage Container Set
Other food-related practices:
- Don’t leave pet food in the bowl overnight — feed on a schedule and put the bowl away
- Keep the kitchen clean of crumbs, especially under appliances and along baseboards
- Empty trash daily or use a bin with a locking lid inside
- If you compost, use a sealed bin or keep it at least 30 feet from the house
Nesting materials and shelter
Mice nest in clutter. A garage or basement filled with cardboard boxes, old newspapers, and stacked fabric is an ideal mouse habitat.
- Replace cardboard boxes in the garage, basement, and attic with plastic storage bins with lids — cardboard is both nesting material and a food source for mice
- Organize firewood: keep it stacked at least 18 inches off the ground and at least 20 feet from the house. Woodpiles are ideal mouse habitat.
- Clear ground-level vegetation, debris, and leaf piles from the foundation perimeter — a 12–18 inch gravel border around the foundation removes the sheltered zone that lets mice approach without being seen by predators
Water sources
Mice need water daily. Leaky faucets under sinks, condensation drip trays under appliances, and standing water in basements all serve as water sources. Fix leaks and ensure there’s no standing water in any enclosed area.

Part 5: Set Up a Monitoring System
Even a well-sealed home can be breached, especially after structural movement (settling, freeze-thaw cycles) reopens sealed gaps, or after construction nearby drives mice to seek new shelter. A monitoring layer gives you an early warning before a single mouse becomes a population.
Glue board monitoring stations
Place glue boards (unbaited — monitoring only) in 3–4 key locations:
- Under the kitchen sink (inside the cabinet)
- In the basement or crawlspace along the perimeter wall
- In the garage near the entrance from outside and near any utility penetrations
- In the attic near the gable vents (if accessible)
Check these boards monthly, or after any event that might compromise exclusion (heavy rain, construction, new gaps appearing). A single mouse caught on a monitoring board tells you that your exclusion has a gap — find it and seal it before additional mice enter.
Catchmaster 72MAX Glue Boards (for monitoring): Catchmaster Max-Catch Glue Traps 72pk, Sticky Mouse Traps Indoor for Home
Annual inspection schedule
Build a once-a-year walk-through into your home maintenance calendar — August or early September, before fall migration begins. Check:
- All previously sealed gaps (caulk cracks, foam has dried and pulled away from the surface)
- Door sweeps and garage door seals (rubber degrades over 3–5 years)
- Vent screens (wildlife damage, rust, loose fasteners)
- Under all sinks
- Behind the refrigerator and stove (pull them out — takes 3 minutes)
The 15-minute fall inspection:
A 15-minute walk-through in August will prevent a 3-week elimination project in November. Schedule it the same way you schedule HVAC filter changes and smoke detector battery replacements.
Mouse-Proofing After an Active Infestation
If you’re mouse-proofing after an active infestation (rather than preventing one), the sequence matters. Don’t seal all exterior entry points while mice are still active inside — you’ll trap surviving mice in the structure with no exit. Trapped mice die in walls, producing odor.
Correct sequence:
- Step 1: Trap until catch rate hits zero for 5–7 consecutive days
- Step 2: Complete interior sealing (under sinks, behind appliances, basement penetrations)
- Step 3: Complete exterior sealing (foundation, utilities, vents, doors)
- Step 4: Set up monitoring boards and establish inspection schedule
For the complete infestation elimination guide before you reach the mouse-proofing phase, see our post on how to get rid of mice in your house. For trap selection and placement during elimination, see our guide to the best mouse traps.
Frequently Asked Questions
Does steel wool actually stop mice?
Steel wool works as a short-term gap filler because mice won’t chew through the sharp metal fibers — but it compresses over time and can rust, reducing its effectiveness within 1–2 years. For a permanent seal, use steel wool or copper mesh (which doesn’t rust) as the filler, then secure it with caulk or foam. The caulk prevents compression and extends the life of the seal. Copper mesh is the better long-term choice.
Does peppermint oil repel mice?
Peppermint oil has some short-term deterrent effect in heavily scented concentrations — mice dislike strong menthol. But it dissipates quickly, requires constant reapplication (daily to weekly), and does nothing to address the structural gaps that let mice in. It’s not a mouse-proofing strategy. If you want to use it as a supplementary measure in a sealed space, place cotton balls soaked in undiluted peppermint oil near potential entry points and replace weekly. Don’t rely on it as your primary prevention.
Can mice chew through expanding foam?
Yes — mice can chew through standard expanding foam. Never use expanding foam alone as the gap filler. Foam is the final sealant applied over a physical barrier (copper mesh, steel wool, or hardware cloth). The physical barrier stops the chewing; the foam covers and secures it. This two-material approach is what makes exclusion work long-term.
How long does mouse-proofing last?
A properly executed exclusion — copper mesh backed by exterior-grade caulk or foam, hardware cloth at vents — lasts 5–10 years. Door sweeps and garage door seals degrade faster (3–5 years) and should be checked annually. The weakest link in any exclusion system is deferred maintenance: caulk cracks, foam pulls away from surfaces, and new gaps open as houses settle. A 15-minute annual inspection catches these before they become problems.
Final Thoughts
Mouse-proofing is fundamentally a one-time project with ongoing annual maintenance. The sealing work is the biggest time investment — a full-house exclusion for an average-sized home typically takes 4–6 hours spread over a weekend. After that, you’re down to 15 minutes once a year and a monthly glance at your monitoring boards.
The return on that investment: no mice chewing wiring, no droppings in the pantry, no scratching sounds at 2am, no elimination project in January. Do the structural work once, maintain it annually, and mice become something that happens in your neighbor’s house.